- 07736 104738
- sam@medicalmassagelady.com
- Mon - Sat, 8:00 - 18:30

Sports therapy isn’t just about treating injuries with massage. It is also about teaching how to prevent performance limiting injuries through correct technique and posture, so that the client can continue to reach their goals, and become fitter and stronger. This “Gains without Pains” series of posts will take common exercises done in the gym and look at correct posture and technique in order to reduce the risk of injury.
CLEAN & JERK
1. clean movement - lifting barbell from the floor into the front racked squatted position to standing
2. Jerk movement - powerfully moving the barbell from the front rack to overhead, elbows locked out position in one, smooth and powerful motion
BENEFITS:-
• increased strength and power of the legs, upper body, and core
• involves a deadlift, squat, and press all in one movement
• increased athletic power
• metabolic movement
COMMON MISTAKES:-
• inconsistent set up - a poor set up position often leads to faults in the first pull
• yanking on the bar - early arm pulling and lack of positional awareness off the floor, particularly through fatigue or heavier lifts, encourages faults in the clean movement
• not staying over the bar - once the bar passes the knee, transition into the second pull. Failure to stay over the barbell often means the hips move forward prematurely, arms bend and failure to finish the pull
• poor front rack mobility – often resulting from poor thoracic, shoulder, back, triceps, and elbows mobility
• limited thoracic mobility and stability - if you tend to collapse through the thoracic spine under weight, you should focus more time on training this area first
GOOD TECHNIQUE:-
1. THE SET UP
• take time to get the starting position correct – feet about hip width, slightly turned out to enable the lifter to keep the knees/thighs out
• shoulders should cover the barbell, with the hips lower than shoulder level yet higher than the knees
• keep the bar close to the shins
2.THE FIRST PULL (when the barbell breaks from the floor to when it passes the knee)
• stay balanced in the full foot, keeping the shoulders above the barbell
• lift with the legs and back
• the angle of the spine should remain fairly constant during this phase
3. THE SECOND PULL (the barbell passes the knee and approaches middle thigh/hips)
• stay balanced in the full foot with the shoulders above the bar
• push through the foot for as long as possible
• finishing as upright as possible to increase the height at which the barbell can be turned over
4. THE THIRD PULL/TURNOVER (forceful rotation of the elbows underneath the barbell and into the front rack position)
• use the trapezius muscle to elevate the bar higher and pull oneself under the bar
• reposition the feet firmly in place to the front squat position
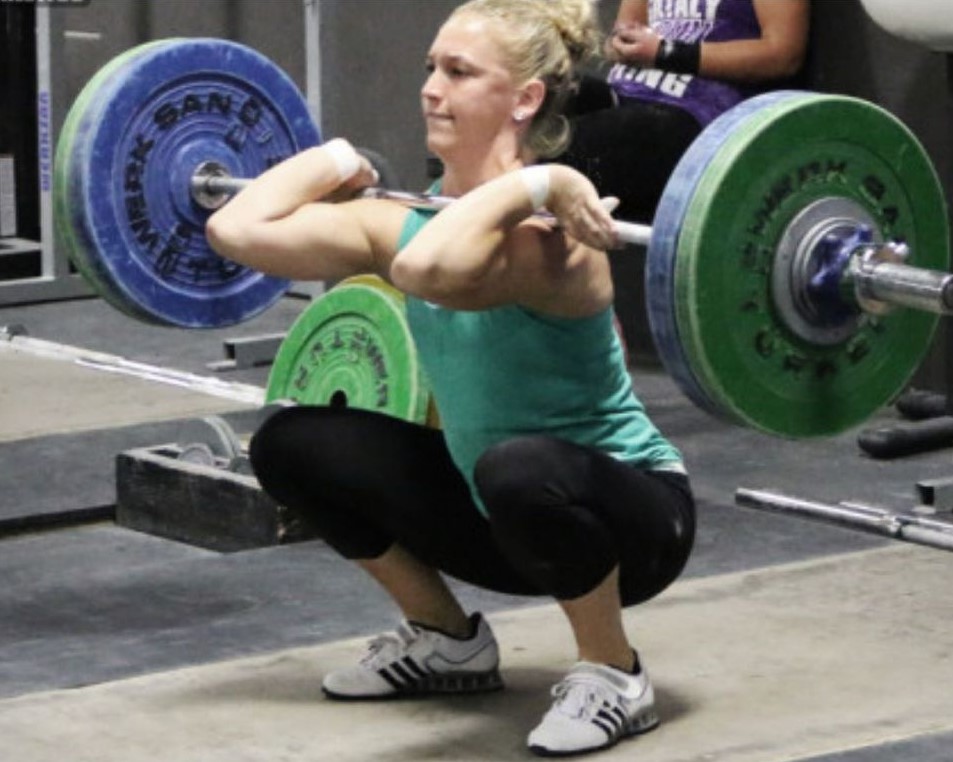
5. THE RECEIVING POSITION (settling in a squatted position with the barbell racked on the front of the shoulders )
• maintain a front squat position with the hips low, chest high, and elbows up
6. THE JERK DIP (the downward loading movement of the jerk, dropping into a quarter squat)
• keep the weight back in the heels and maintain a rigid upright torso and elbows to avoid falling forwards or losing balance in the dip
• bend the knees and hips slightly to load the legs
7. THE JERK DRIVE (driving the weight off the body)
• use the upper body muscles to stabilise the torso rather than to press the weight
• forcefully use the leg muscles to stand up at the succession of the dip
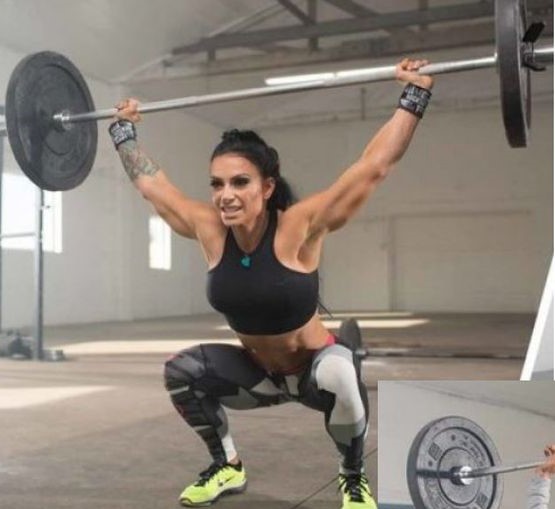
8. RECEIVE AND RECOVER THE JERK OVERHEAD
moving the feet into the proper finishing position depending on the type of jerk ie.split, power, push, or squat jerk


